In this article I would like to share a few tips with you, which I use during programming of PLC controllers. No worries, I will not explain logic functions or ladder programming. I will present a few advices and tips making easier, not only program writing, but also subsequent analysis and modernization.
In my career I had to deal with many controllers from different manufacturers, such as Siemens, Allan Bradley, GeFanuc, Horner, Unitronics and others. Many of them I have programmed from the basics, but I also had a lot of cases where I had to modernize the program or precisely analyze it. I’ve met different programming styles. One of them were inspiring and admirable, and the others pushed me away from the monitor. I’m not some kind of programming Guru, but many of controllers, programmed by me, are still working. Let me share my observations with you.
#0 Get acquainted with the development environment.
No matter which controllers you start programming, in every software e.g. TiaPortal, Simatic Manager – Step7, RSLogix, at the beginning you should take time to get to know this development environment. Familiarize yourself with the possibilities of this program, check which controllers and modules you can program with the use of this program. Configure the windows settings and expose the shortcuts of the most often used functions. Press F1 key and check what the keyboard shortcuts are. For example, in Step 7 – F2, F3 are used for inserting in ladder program the NO and NC gates. Write down or print such a shortcuts, put them on your desk and make the use of them.
Check what devices are shared by your software. For example, in TiaPortal and Step7 there are tools for generating the controller memory map “Cross Reference”. Thanks to this tool we can check what memory areas are already used and avoid using, for example, the same marker in two different operations.
In general, do not hurry, take your time and get acquainted with the programming tools.
ADVANTAGES:
- More efficient program writing.
- Optimization of program thanks to the software tools.
- PLC programming becomes easier thanks to the personalization of the development environment.
#1 Organize the program files.
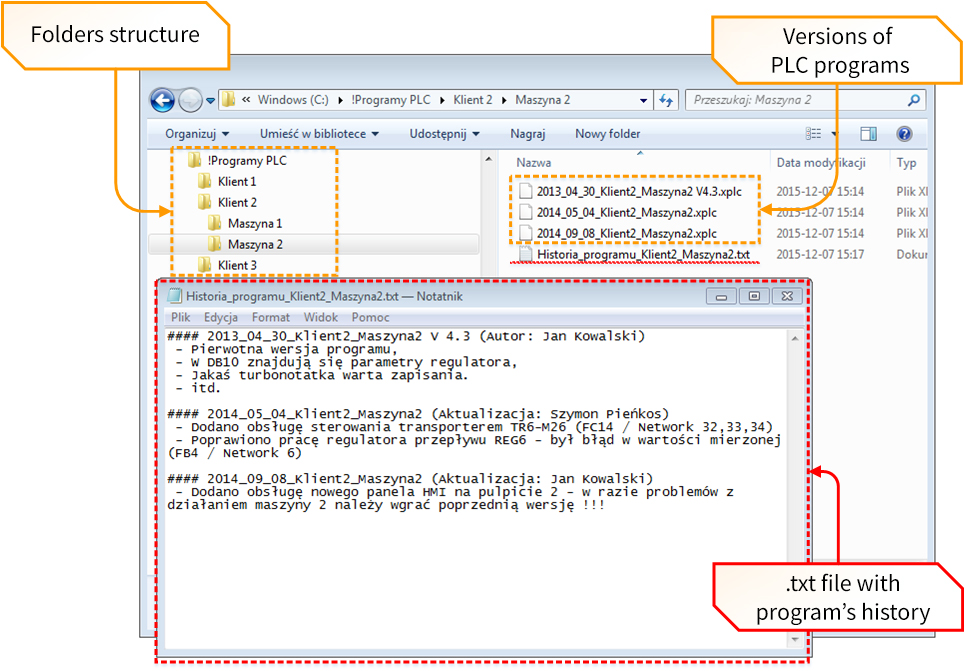
Develop good habits. One of them is good planning of PLC program files. Create your own structure of folders, where you will divide them into, for example, clients, rooms or machines – it depends on the character of your work.
Each version of the program save in new file/project in one format name. So far, the name of the file or folder with the date, name and version of the program suits me the most:
Format: YYYY_MM_DD_ NAME_VERSION
Example: 2015_07_26_wrapping_machine_Vo.4
Thanks to the date we know when the last program version was created, but also we know when the first version and last PLC program update was made.
The name specifies the client, place or type of machine, depending on character of the project.
The program version is not necessary. It can be useful during testing the program, creating several version in one day and subsequently uploading them into the PLC controller. Such a practice is extremely useful, for example, after accidentally removing a part of the PLC program – you can always go back to the previous version :). The programmer appreciates it only after losing many hours of work on the PLC program.
We can analogously proceed by naming folders and put in them program files with any name.
ADVANTAGES:
- Good file system helps us to manage the programs in more efficient way.
- By setting the beginning of the name as YYYY_MM_DD, programs will be set from the oldest to the newest ones.
#2 Save the history of PLC program.
For every PLC project you can create a simple .txt file and put it in the main folder with the versions of given PLC program. Save there every change or set of changes from the moment of final “working” version of PLC program. Below you can see the example of it:
ADVANTAGES:
- You, just like everyone else, to whom you share the program files will know the history of changes. This is very useful for several people who have access to the PLC – in the case of a malfunction, another person can upload the previous version.
- In retrospect, we can forget how the program works, even though we wrote it by ourselves, because the more we write during its creation the better.
- One appropriate sentence from a year before can recall a lot. Without it you would have to, for example, re-analyze part of the program code.
#3 Name the variables/symbols in the program in a proper way.
In every programming environment the variables (words, bits, etc.) can be described by the symbols and/or comments. Small programs, without detailed comment, are not a big challenge. Big programs, without good descriptions, are very difficult for analyzing. Well described program makes the further work easier, but also helps the programmers for better exploitation of this program. There are several ways of describing the data addresses, some of the programs contains short descriptions, and some have more detailed descriptions. Very detailed descriptions take a lot of time and they are used in the recurrent programs, for instance when company sells a lot of products with PLC software.
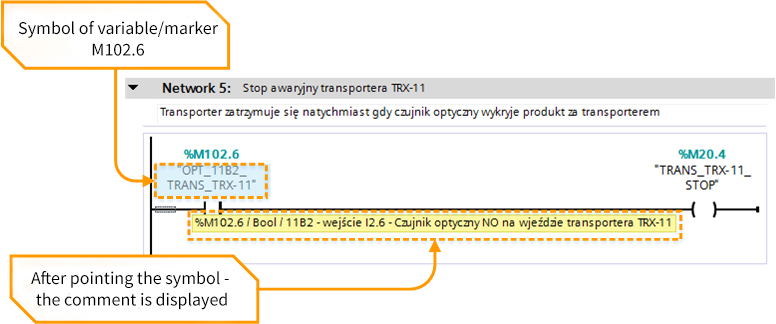
Name of the symbol (tag) of variable is usually limited to only few signs. The symbol of variable is often briefly described. It’s good when we are able to guess the meaning of this symbol. For example, optic sensor 11B2 is installed on TRX-11 transporter. The symbol of variable responsible for operation of this sensor, could have the following name:
- OPT_11B2_TRANS_TRX-11
It is important that the subsequent sensors and remaining variables have an analogous names. Subsequent 12B6 optic sensor on TRX-24 should not be named like this.:
- FOTOKOMORKA_12B6_TRX-24
It should be named like this:
- OPT_12B6_TRANS_TRX-24
Some of PLC software do not tolerate space and, for example, polish letters in symbols names. I had this situation: I had to program and communicate PLC S7-1200 Siemens controller and WEINTEK touch panel. In the PLC S7-1200 controller I used polish letters in the names, without any problems. When I used the import variables function from S7-1200 to WEINTEK, problems have started. Variables without polish letters were displayed correctly, but the ones with polish letters were displayed incorrectly.
For variables, in some software, we can add comments, which are not visible directly in the program code, but only when you point on the variable with a mouse. This can be extremely helpful, not only for the PLC programmer, but mostly for other people for analyzing the program. The comment for our 11B2 optical sensor could look like this:
“11B2 – input I2.6 – Optical sensor NO on TRX-11 transporter”
Below you can see the example from Siemens TiaPortal environment:
Personally, I think that it is necessary to describe variables with the symbols in PLC programs.
ADVANTAGES:
- The more descriptions of variables, the more readable the program is.
- When we return to the program from a few months or years, we appreciate the effort we put in precise descriptions.
- Program is clear for third parties, for example in diagnostics of incorrect operation of control system.
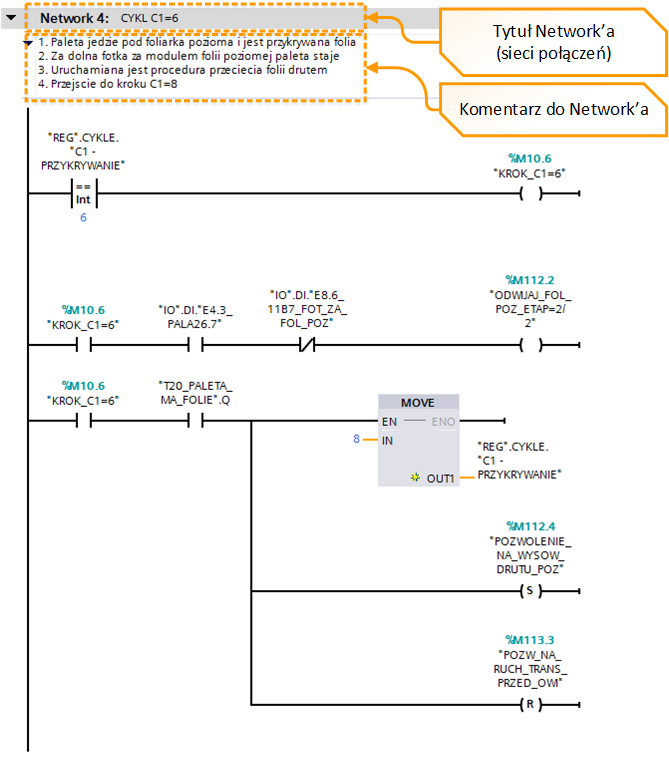
#4 Describe PLC program.
If we had a lot of time for writing PLC program, it worth to create detailed code lines. Especially in the case of big and/or complex programs. I think, that every network should contain at least a title. Some of programming environments allows for adding detailed comments to every network. Example in TiaPortal:
ADVANTAGES:
- The more descriptions of variables, the more readable the program is.
- When we return to the program from a few months or years, we appreciate the effort we put in precise descriptions.
- Program is clear for third parties, for example in diagnostics of incorrect operation of control system.
#5 Organize the area of bit memory.
If in the controller we cannot organize memory in tables, before attempting to write a PLC program, try to at least pre-allocate the demand for the controller’s memory area. Try to estimate how many words (registers) will be used in the program and divide them functionally.
For example, if we have a system consisting of 10 measuring devices, from which we get one measurement. We want to write them to 32-bit REAL registers (float). Our measurements are configurable from the operator panel and each measuring device requires one setting (adjustable parameter). We program the Siemens controller.
We can adopt the strategy, so our measurement values start from memory address MD100:
- MD100 – measurement 1
- MD104 – measurement 2
- MD108 – measurement 3
- MD112 – measurement 4
- …
- MD136 – measurement 10
We do not anticipate more measuring devices in our system but we cautiously leave a few reserve registers for future measurements. We can further define registers with parameters, e.g.:
- MD160 – parameter 1
- MD164 – parameter 2
- MD168 – parameter 3
- MD172 – parameter 4
- …
- MD196 – parameter 10
The main point is to keep the analogy and logical sequence of parameters. You should not mix registers and leaving them in a mess. The higher the repeatability of your program, the more readable it is.
ADVANTAGES:
- Orderliness in registers.
- Readability of the program through analogy and repeatability.
- Higher control over the controller memory.
#6 Use data blocks.
Using the data blocks (e.g. in Siemens or Allen Bradley controllers) makes it easier to organize the controller memory. Program registers can be assigned to suitable blocks, due to function, place, structures, devices groups, etc. When placing these registers we do not have to pay attention to orderliness.
Example 1:
- DB1 – Flowmeters (measurements and parameters)
- DB2 – Pressure sensors (measurements and parameters)
- DB3 – Pumps (measurements and parameters)
- DB4 – Alerts
- DB5 – ….
Example 2:
- DB1 – Measurement values (flowmeters, pressure sensors, pumps)
- DB2 – Parameters (flowmeters, pressure sensors, pumps)
- DB3 – Alerts
- DB4 – …..
ADVANTAGES:
- Bigger order in registers.
- Readability of the program through analogy and repeatability.
- Much higher control over the controller memory.